
So one of the wonderful things about this project is the different disciplines I’m reaching into. Some of them are comfortable core skills, some of them far outside my expertise. Sound design is definitely one of the ones on the outside. And just like looking at complex rule systems, it started with asking the wrong questions, with the same right answer:
“How do you want it to feel?”
(4D6? 2D10? NO. How do you want it to feel? What is the kind of experience you are conveying?)
I started out by asking questions around “How do you create room echo?” and “How do you make vocals sound like they’re in a particular space? Far away?” These were second or third order concerns. The starting question should have been “Does it sound clear? Followed by does it sound good” These recalibrations are always a joy to go through. I’m very used to voice actors early in their journey obsessing over cool vocal tricks or impressions, but it always comes back to that solid foundation rather than the flashy stuff around the edges. I’ll be going through the tools I’ve added to my belt over this process as well. Some or all of this might come across as a bit Mixing For Dummies for folks who are experienced sound designers.
Mixing For Clarity
This should really be renamed to mixing for clarity, as that became the primary concern - ensuring clarity for vocals first. The starting point for clarity is good clean dry audio, which is what I normally produce for clients when recording. Then, there are considerations like volume, and where the voice sits in the frequency spectrum.
Is It Too Soft? Too Loud?
Alexa has a published specification for loudness level for all audio assets. To measure this, I grabbed
I’ll be adding a step to the workflow of publishing sound assets to automatically check assets for appropriate LUFS levels before uploading to S3 - I’ll put that script up in
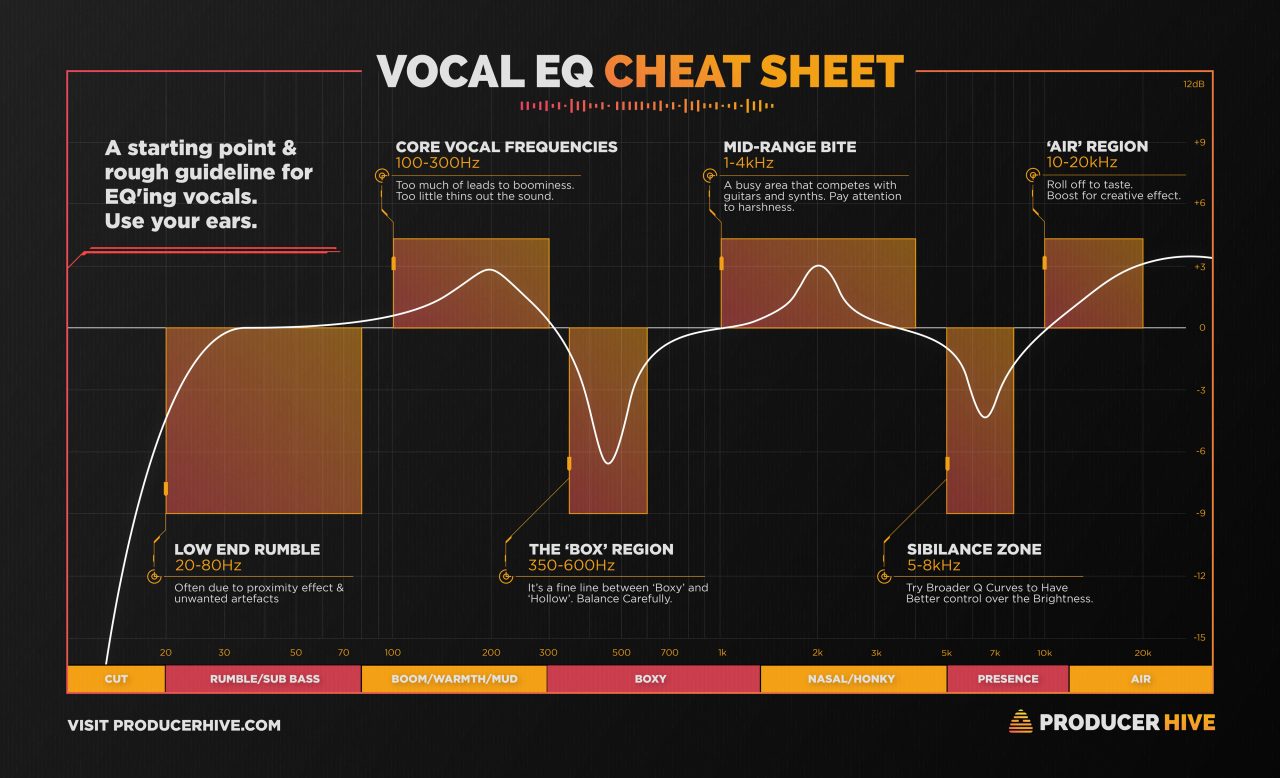
Where Does It Sit In The EQ?
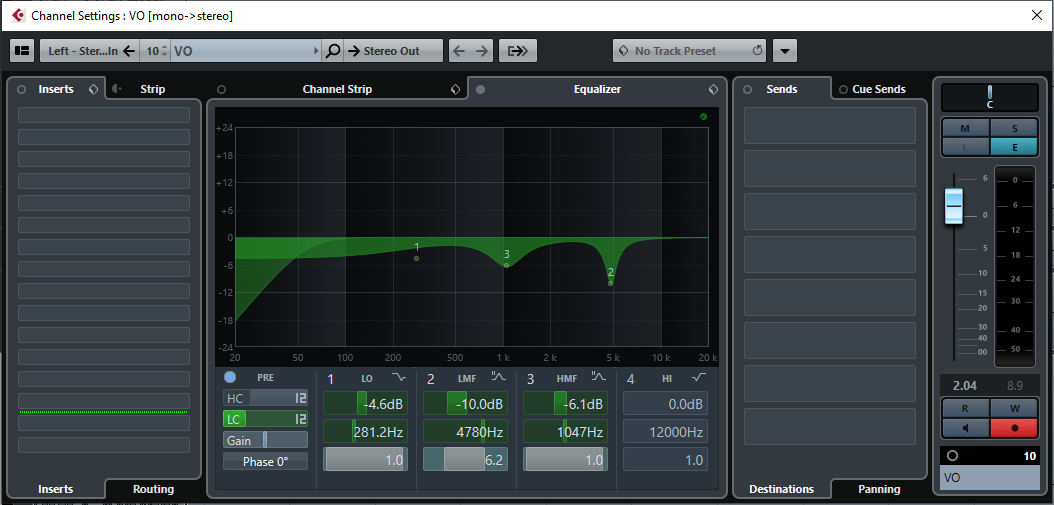
This is where I spent a lot of time, in understanding and experimentation. In my own voice over work, I’ve only ever done basic EQ adjustments, mostly relying on dry audio. In order to understand how to make any improvements, or what I’d lose fighting against something else in the mix, I first had to understand this:
(Cheers to Chris O’Neill for starting me down this road)
The initial recommendation from consults was to start with a bake-off - go with a series of EQ treatments and see what sounds best. Somehow I always think there’s a magic bullet outside of my own disciplines, but SURPRISINGLY, experimentation and evaluation is the thing. With some tinkering, I could really hear some of the characteristics - dropping boxiness and boosting the mid-range subtly sounded like great gradual improvements. I suspect past a point my ear doesn’t have the precision for subtle changes - I found it difficult to compare some options, and for post-processing like saturation, found it very difficult to clearly discern differences.
This awesomeness came from the amazing Belinda Coomes as a result of one of our consults:
Coming from an approach I never would have thought to start from - listening to voice acting with a similar sound from games and adjusting accordingly.
A Very Brief Essay On Sound Design From A Complete Novice
So, now that vocals are sounding good, it’s time to start sound design! What follows is largely me regurgitating the excellent advice I received. Also, I grossly underestimated how long it would take to put together even a basic prototype, while learning sound design and with everything else going on. (points outside window) It was a fantastic challenge though!
Where To Start
Start by storyboarding sounds. What sounds are going into the experience? Then source sounds that fit the feeling of what you’re putting together, as well as the world it sits in. A 1950s ghost story door opening will sound different to a 1950s noir detective agency door being rattled off its hinges.
When it comes to sound effects and post-processing, especially for an Alexa skill, a little is a lot. With voice being the only channel of communication, aesthetic choices need to work alongside clarity. Showiness needs to take second place, and when it comes to indicating things like distance or room size, suggestion or differentiation is fine - realistic simulation is overkill.
Create A Scene Mix
Once everything is together, the next step is a scene mix. Put dialogue, sound effects and any atmosphere together in a master mix. This is one area where I did have some great success. I’m still wrapping my head around some of the finer details of variable sends to FX buses, but it was fairly straightforward to put together a project in REAPER that allowed everything to be heard side by side, and rendered directly to individual files. I’ll post about this in the near future, because REAPER region matrices are a thing.
Some points here on creating a master mix:
- Side chain compression can be used to gently duck any atmosphere sound or music under vocals. Vocal clarity is key.
- Once everything is in place, the EQ of the whole mix can be considered. This is where I started using Izotope Insight’s spectrum tool, but chances are you’ve got your own favourite EQ spectogram/graph/thing.
Vocals and SFX side by side
One of the big questions I looked at was the overall approach to sound design going forward - whether to put sound effects in isolation ahead of dialogue, similar to a radio play, where the dialogue then explains the sound effects and gives additional context, or more like a traditional video game, where sound effects and dialogue coexist. Some great advice that came out of the last consult during this section tipped the scales - for the most immersive feeling, both need to co-exist and spill over each other. There are other concerns around glueing those sounds together in Alexa, but we’ll come back to that in dynamic audio.
Now things start to loop back to where we started with the frequency spectrum for voice. The frequency of each sound effect (or atmosphere sounds) needs to be considered against vocals, to avoid fighting over key areas of the spectrum.
The general tool here to avoid clashes is EQ-ing, so it’s important to understand what we’re protecting or giving up in terms of voice characteristics.
A multipressor was also recommended, to subtly compress some parts of the frequency spectrum more heavily than others, to get out of the way of key vocal frequencies.
Where To From Here?
This part of the project was a fantastic learning process, but there’s a lot more I’d like to get back to.
- Going further with a master mix - to put some basic EQ and compression over the master mix to unify things a little more. Especially wrapping my head around partial sends to reverb buses.
- Extending the sample scene to include some SFX for entering the scene, a more ‘sci-fi’ atmosphere, footsteps to transition between objects, and more comprehensive sound design for individual sound effects. This would become almost a teaser trailer for this sort of experience, as well as fleshing out some more comprehensive estimates around sound design for individual assets.
- Extending the sample scene to revamp dialogue to give character, point of view and urgency - post-reading through Verbalize.
- Experimenting with baking in dynamic atmosphere as part of dialogue files with a pre-configured fade-in fade-out curve. This is to work around a current limitation with Alexa skills where only Skill Flow Builder is capable of playing background music/audio.
Phew. This was a big, challenging stretch. Now on to epistolary narrative!